PackOut Tutorials

Assured Customer Support

Frequently asked questions

GS-1 Identifier
How To: Log Into JobCheck for the First Time
This tutorial will guide you through how to log in to Assured JobCheck for the first time.

Welcome Email:
When an Assured Admin adds a new Employee to Assured JobCheck and enables that employee as a User, the new user will receive an email that includes a link to set-up their password to access JobCheck for the first time.

GS-2 Identifier
Orientation: Job Page Overview

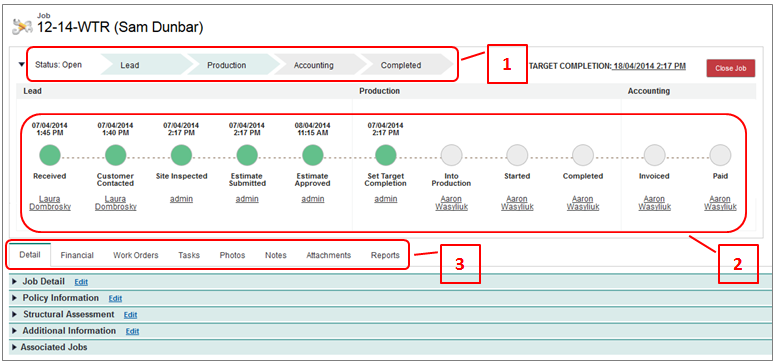
This tutorial will describe how to navigate the job page in Assured JobCheck and will detail how each of the tabs pertain when managing your jobs.

Navigation

The job page can be accessed by opening any job from the dashboard in the Home tab located in the primary navigation (Figure 1). Once the job is open, all aspects of the job can be managed from the web desktop using the secondary navigation bar (Figure 2).

Figure 1: Primary Navigation – Global

Figure 2: Secondary Navigation Bar – Within the Job

Job Page Interface

Whether starting a new job or opening an existing job, you will be directed to the main job screen (Figure 3). From the main job screen, you can see your job progress at a glance and manage all aspects of the job by navigating using the secondary navigation bar.
Figure 3: Main Job Screen – Within the Job
As shown in Figure 3, some of the tools available to help you manage your job include the job stage banner (1), milestone banner (2), and secondary navigation bar (3).

Job Stage Banner

This banner indicates the current stage of a job based on the completion of milestones. When certain milestones are completed, the banner updates to show that the job has moved to the next stage.
Lead A job begins in the lead stage and remains a lead until the target completion date has been set. At this stage, the admin and estimator are responsible to move this job to the stage of production.
Production Indicates that the target completion date has been set. At this stage, the project manager is responsible for ensuring that all work for the job is assigned and completed before handing off to accounting.
Accounting Indicates that all work orders have been completed and the milestone for completed has been selected. Now the accountant will be responsible for taking this job to completion.
Completed Once payment for the job has been received, the milestone paid can be selected and this job will attain the status of completed and can then be closed.

Milestone Banner

The milestone banner is a tool to help the project manager see detail about the stage of a job in progress. The milestone banner is meant to be updated as each milestone is completed so as to empower the project manager to know who is responsible for taking the job to the next stage and ensure that the job remains on schedule per the target completion date.
Received When a new job is started, this milestone is automatically selected.
Customer Contacted This milestone is connected to the first contacted date in the job detail and will become selected automatically when the first contacted date is entered.
Site Inspected Must be manually selected once the site inspection/walk-thru has been completed.
Estimate Submitted Selected by the estimator once the estimate has been created and submitted.
Estimate Approved To be selected once the estimate has been and received back as approved.  At this point, if the estimate is not approved, the job can be closed and the milestone left as estimate submitted.
Set Target Completion This date should be set as soon as the estimated date of completion is known; setting the target completion date will auto-select the milestone as completed, it will also move the job from status of lead into production.
Into Production Indicates that the job has now changed hands from the estimator to the project manager.  Now that the estimate has been approved and entered, a financial plan can be created with a budget for the job and work orders can be created and assigned.
Started This indicates that work orders have been issued and that resources have started work on the job.
Completed Indicates that all work orders and tasks have been completed for the job and that the progress of the job will be turned over to the accountant.  Job status will read accounting.
Invoiced Can be completed once the job has been invoiced and is awaiting payment.
Paid Once payment has been received this milestone can be completed and the job will change from accounting status to completed.

Secondary Navigation Bar – Job Navigation

Detail Role: Office Admin or Front Desk

Collect first notice of loss (FNOL) information upon receipt of a new job – job details are accessible on the mobile app.

  • Capture customer, loss, policy and structural information.
  • Associate jobs
  • Assign user roles to take the lead as office admin, project manager, estimator or accountant on the job – these users will be responsible for completing specified milestones.
Financial Role : Estimator or Project Manager

Create a financial plan and track job costing.  This will often be populated following the site inspection and estimate approval.

  • Create a work order from a budgeted category of work.
  • Create a budget for categories of work to be completed and specify a desired gross margin (GM).
  • Send the job to QuickBooks and import revenue/expenses for job costing comparison.
Work Orders Role : Project Manager

View the current status of work orders open on the job, and see all work orders in a list.

  • Assign work orders to a project lead.
  • Create new work orders.
  • Modify existing work orders.
  • Schedule work orders and assign resources.
Tasks Role : Office Admin or Project Manager
Apply a task template when a new job is started to save time creating standard tasks for specific job types.
  • Create singular job tasks.
  • Assign tasks to users.
  • Schedule existing tasks for completion.
Photos Role : Office Admin
Prepare a new job with pre-set albums for faster in-field upload or view uploaded photos. 
  • Create, modify and view albums.
  • Manage photos using the photo toolbar:  Select, Sort, Move To, Delete and Option.
Notes Role : Office Admin

Capture important data about the job site; 

  • Add supporting images.
  • View by most recent or search using keywords.
Attachments Role : Any User
Consolidate important documents into the job for reference on the web desktop or in the field from the mobile app.    
  • Add signed copies of work authorization forms, customer satisfaction surveys or adjuster approvals. 
  • Search attachments by keyword using the ‘Search’ bar for quick access to the files you need.
Reports Role : Any User
Access job-specific reports such as the job detail report.
  • Manage reporting criteria. 
  • Exclude fields if not applicable to the recipient, then print or download the file.
GS-3 Identifier
How To: Add a New Job

This tutorial will guide you through the steps for adding a new job in Assured JobCheck (All Editions: Premium, Professional and PackOut).

GS-4 Identifier
How To: Update Your Chatter User Profile Photo
This tutorial will guide you through how to update your chatter user profile photo so that your picture will appear next to your name when your activity or relationship to a job is visible.
GS-5 Identifier
How to Add Users for PackOut Edition
This tutorial will demonstrate how to add a new user to JobCheck PackOut Edition.
GS-6 Identifier
How to Create Item and Box QR Code Labels

This tutorial will demonstrate how to create QR code labels for items and boxes that will be packed out from the job site; QR code labels help to identify what an item is or a box contains and who it belongs to. These item and box tags are also a requirement if you plan to scan items for warehouse tracking.

GS-7 Identifier
How To Deactivate Users in Assured JobCheck
This tutorial will demonstrate how to deactivate employees and users in Assured JobCheck. When roles change or employees leave, it may be necessary to disable the employee’s user access to the system to free up their license and deactivate them as an employee so they no longer show in the iPad dropdown for ‘packed-by’ technicians: in this tutorial, you will learn to do both.
CLM-1 Identifier
How to Add an Employee to the Packed By Dropdown
This tutorial will demonstrate how to add an employee to the PackOut Edition system. Employees do not have access to login, but will appear in the ‘packed by’ dropdown on the iPad.
CLM-2 Identifier
How To: Add Inventory on the iPad
This tutorial will demonstrate how to create an electronic inventory list in the Assured PackOut iPad app for the PackOut Edition of JobCheck and how to upload that list to the job on your computer.

CLM-3 Identifier

Best Practices – Inventory Listing Tips & Tricks
This tutorial will provide guidelines to help technicians identify and categorize different listing types and will offer best practices to help keep the listing process fast, accurate and pain-free. Read below to learn how to approach listing items vs. boxed content, low vs. high value content, items with pre-existing damage and non-salvage items.
CLM-4 Identifier
How To: Review and Edit an Inventory List
This tutorial will demonstrate how to filter and review an inventory list, mass edit the list and prepare it for pricing or reporting.

CLM-5 Identifier

How To: Use Inventory Cleaning Pricing
This tutorial will demonstrate how to price a contents listing after the upload and review of the pack-out inventory list. The priced list can be and sent to adjusters as the cleaning detail to support your invoice.

CLM-6 Identifier

How To: Create an Invoice Report
This tutorial will demonstrate how to price a contents listing after the upload and review of the pack-out inventory list. The priced list can be and sent to adjusters as the cleaning detail to support your invoice.
CLM-7 Identifier
How To: Setup Pricing Templates for Cleaning Contents
This tutorial will demonstrate how to setup the cleaning pricing templates for inventory categories and box sizes on the JobCheck web application. Pre-setting these values will ensure that inventory uploads from the Assured PackOut iPad app will be priced automatically.

CLM-8 Identifier

Recommended Workflow – PackOut Edition Quick Guide
CLM-9 Identifier
How To View, Upload and Email Room Photos, Reports & Files
This tutorial will demonstrate how to view, upload, organize and share your photo and file attachments when accessing the job in a web browser.
CLM-10 Identifier
How to Use Inventory Processes to Determine How Inventory is to be Handled
This tutorial will demonstrate how Processes can be used to define how inventory should be treated/handled when listing in the field and reviewing/managing inventory back at the office.
CLM-11 Identifier
How to Customize Inventory Processes
This tutorial will demonstrate how to customize the dropdown selection for inventory processes when adding or changing listed inventory in JobCheck PackOut Edition and the Assured PackOut iPad app.

CLM-12 Identifier

How to Create a Complete Inventory Photo Presentation Report
This tutorial will demonstrate how to generate a photo presentation report; this report is one of the first reports created following the completion of the pack-out at the job-site. This report is commonly used to show a list of all contents packed-out and includes photos of both the items and any pre-existing damage and is often sent to the homeowner and adjuster to limit company liability for damaged items.

CLM-13 Identifier

How To: Customize Warehouse Locations for Trackit
This tutorial will demonstrate how to customize the available selection for warehouse locations when changing the location of listed inventory in JobCheck Trackit or the Assured JobCheck PackOut Edition.
CLM-14 Identifier
How to Track Inventory Through the Warehouse
This tutorial will demonstrate how to track inventory throughout your warehouse and storage locations by scanning items and boxes with the TrackIt app for iPad or iPhone. Real-time tracking makes it easy to find a client’s inventory quickly in your warehouse.
CLM-15 Identifier
How to Locate Items and Boxes in your Warehouse
This tutorial will demonstrate how to search for and locate an item or box in your warehouse.
CLM-16 Identifier
How to Return Inventory and Print Return Reports

This tutorial will demonstrate how to mark inventory items as returned in real-time using the Assured TrackIt iPad app and how to report on all items returned in a period.

CLM-17 Identifier
How to Generate a Box Count
This tutorial will demonstrate how to easily determine the number of boxes assigned (grouped by box size) during the pack-out. A box count can be achieved in one of two ways: via inventory filters or via report.
CLM-18 Identifier
How to Generate a Tabular Total Loss Report PDF/XLS
This tutorial will demonstrate how to generate a total loss report in a tabular format and how to export it to Excel™. The Total Loss report is the most frequently requested report by adjusters; it may or may not include photos, depending on what is required by the specific insurance company or adjuster. The following example will demonstrate a non-photo (Tabular) report; however, if you would like the report to include photos, simply choose the Presentation report option.
CLM-19 Identifier
How to Generate a Photo Total Loss Report
This tutorial will demonstrate how to generate a total loss report in a presentation (photo) report format. The Total Loss report is the most frequently requested report by adjusters; it may or may not include photos, depending on what is required by the specific insurance company or adjuster. The following example will demonstrate a photo (Presentation) report; however, if you would like the report to exclude photos, simply choose the Tabular report option.
CLM-20 Identifier
How to Email a Report Out of JobCheck
This tutorial will demonstrate how to email a report as a link to an adjuster or a homeowner, direct out of the job’s attachments tab.
CLM-21 Identifier
How to Reprint Item and Box QR Code Labels
This tutorial will demonstrate how to reprint item and box tags when the cleaning stage is complete and items are being re-packaged for clean storage and return.
CLM-22 Identifier
How to Insert a Custom Report Cover Page
This tutorial will demonstrate how to create a report with a custom cover page. If you are a company that does business under two or more company names, it may be necessary to format a custom cover page with different company name and contact information. Below are instructions on how to insert and attach a custom cover page to a report generated by Assured JobCheck.
CLM-23 Identifier
How To: Export Inventory Item Photos to JPEG
This tutorial will demonstrate how to export all inventory item photos into a zip folder. The photo export tool is a great way to extract your inventory photos when viewing them in the image gallery online (accessible via reports) is not enough.
CLM-24 Identifier
How To Create a Room Photo Report
This tutorial will demonstrate how to create a PDF report for select room folders and photos that can be shared with adjusters and homeowners.
CLM-25 Identifier
How to Export Inventory to an Excel Insurance Template
This tutorial will provide a guide on how to export an inventory list from JobCheck in a simple .csv format that can easily import into a pre-formatted template provided by an adjuster or insurance company (ie. Total Loss template provided by the insurance company).
CLM-26 Identifier
How to Merge Reports
This tutorial will demonstrate how to use the Merge Reports function under Attachments to merge up to three separate PDF documents into one document or report.
CLM-27 Identifier
How to Customize Email Notifications
This tutorial will demonstrate how to modify and customize the types of email notifications that you will receive from Assured JobCheck. You can choose to turn on/off email notifications for tasks, @mention, daily digest and more.
CLM-28 Identifier
How To Enable Full Sync for PackOut
This tutorial will demonstrate how to enable the full sync feature in your Assured PackOut™ app to allow for the app to both upload inventory into the JobCheck™ cloud system and also download full inventory from the job database to update the app. When full sync is enabled, one device will show all inventory that has been listed and uploaded by all devices.
JWM-1 Identifier
Recommended Workflow: Start and Manage a Job
This tutorial will define the recommended workflow when starting a new job in Assured JobCheck.
  1. Open JobCheck Web Desktop and log in as any user.
  2. Open the Home tab and click “New Job” to create a new job
    • Enter a custom Job Number
    • Associate an Office Admin, Project Manager, Estimator and Accountant.
    • Enter First Contact Info.
    • Create the Customer Account – (whoever you are doing the work for).
    • Create a Main Contact, include email and mobile number.
    • Enter Loss Information and select all Immediate Concerns.
    • Click “Save”.
  3. Click the Tasks tab > Apply a task template.
  4. Click the Photos tab > Pre-setup albums per your Service Level Agreement (SLA) (albums by room, or timeline).
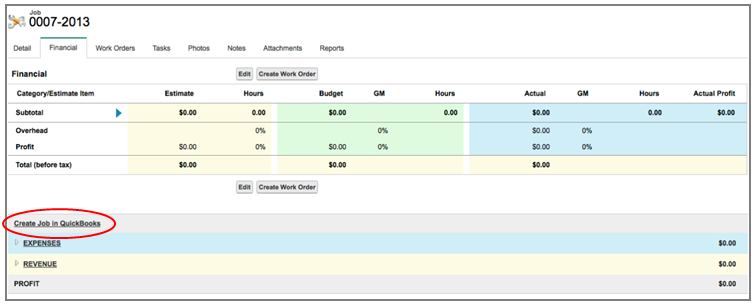
  5. Click the Financials tab > Send Job to QuickBooks.
  6. Click the Work Orders tab > Create emergency work orders, if applicable.
The job is now ready to be updated by the project manager or technician in the field from the mobile app.
  • 7. Login to the mobile app on-site > Update the job with loss photos and site notes.
  • 8. Open the Home tab and click “New Job” to create a new job
    • Enter categories of work and values from the estimate.
    • Create a budget for all categories of work.
  • 9. Create work orders using the budgeted estimate items.
    • Schedule work orders.
    • Assign resources.
  • 10. Complete tasks and work orders from the mobile throughout the progress of the job.
  • 11. As work orders are completed, update the financial progress on completed work orders.
    • Complete milestones.
    • Make budget adjustments to remaining work orders as needed.
  • 12. ​​Review Job status then close the job.
    • Complete any outstanding work orders or tasks.
    • Ensure the job has been invoiced and paid.
JWM-2 Identifier
How To: Add an Employee
How do I change my password in JobCheck?

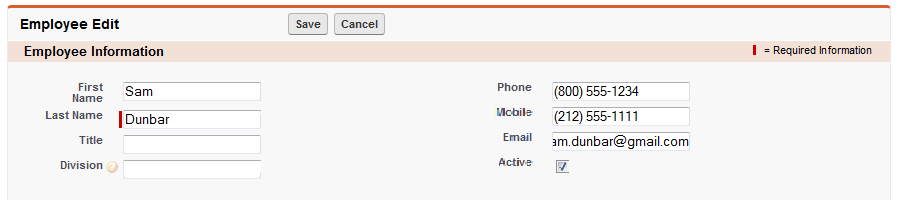
This tutorial will demonstrate how to add an employee to the system. Employees will appear in your schedule and can be added as resources to work orders.

  1. Log in to JobCheck Web Desktop as any user.
  2. Click on Employees from the primary navigation bar.
  3. Click “New” to create a new employee contact.
    • Enter employee information.
    • Leave the radio button for active selected
To deactivate an employee, simply edit the employee contact and de-select the radio button for ‘active’.
  • Enter address information, if applicable.
  • Enter any additional information, if applicable.
  • Click “Save”.

The employee will now be available as a resource and can be assigned to work orders. 

Open the employee contact to see the full contact detail, including if this contact is currently assigned to a job as well as historical job assignment.

JWM-3 Identifier
How To: Add a Sub Trade Contact

This tutorial will demonstrate how to add a sub trade to the system. Sub trades will appear in your schedule and can be added as resources to work orders.

  1. Log in to JobCheck Web Desktop as any user.
  2. Click on Accounts tab from the primary navigation bar.
  3. Click “New Account”
    • Enter the account name (the name of the sub-trade).
    • Choose the type as Sub Trade.
    • Enter contact information and address information.
  • Click “Save”.
  • If you would like to add contacts associated to this sub trade account, open the account and click “New Contact”.
The sub trade will now be available as a resource and can be assigned to work orders. Open the sub trade account to see the full account detail, including if this sub trade is currently assigned to a job, as well as historical job assignment.
JWM-4 Identifier
How To: Add an Account

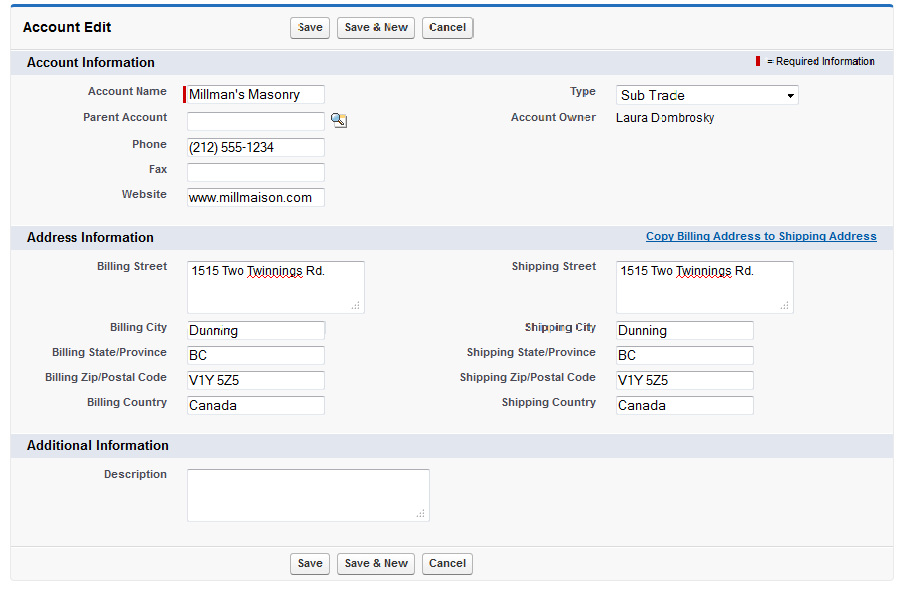
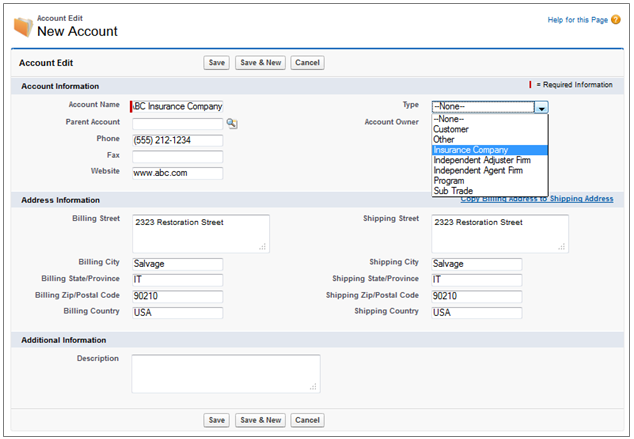
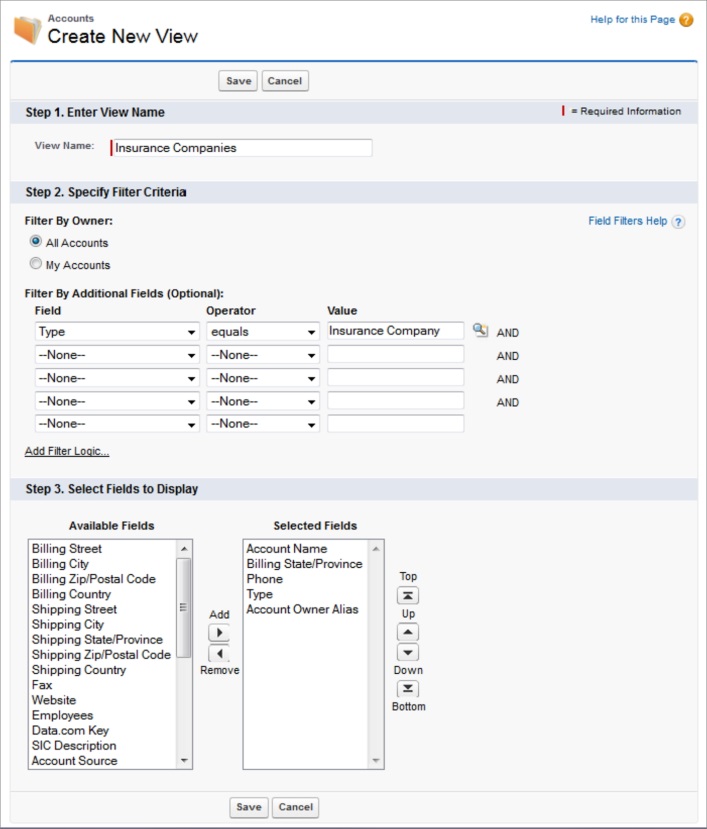
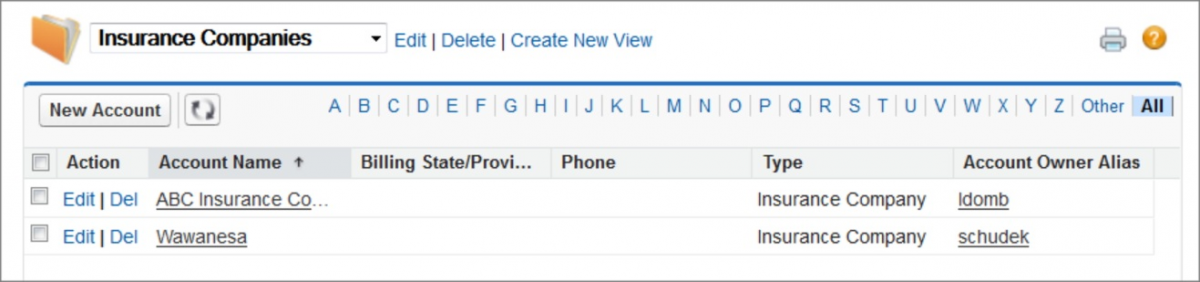
This tutorial will demonstrate how to manually add an account to the system. Accounts represent the company that you are doing business with.

  1. Log in to JobCheck Web Desktop as any user.
  2. Click on Accounts from the primary navigation bar.
  3. Click “New Account”
    • ​​Enter the account name (the name of the insurance company, agent/adjuster firm, program or sub trade).
    • Choose the type of account that is being added.
    • Enter contact information and address information.
  • 4. Click “Save”.
  • 5. If you would like to add contacts associated to this account, open the account and click “New Contact”.
The account will now be available from your mobile contact list and can be associated with new jobs in the job detail page. Open the account to see the full account detail, including if this account is currently assigned to a job, as well as historical job assignment.
JWM-5 Identifier
How To: Create a Form Template

This tutorial will demonstrate how to create a form template in Assured JobCheck. Form templates can be created to include merge fields that will auto-populate specified data when applied to the job, making the form customized to the job it is applied to.

JWM-6 Identifier
How To: Apply a Form Template

This tutorial will demonstrate how to apply a form template to a job. When a form template is applied to a job, specified merge fields will auto-fill with job specific information and can then be saved to the job under attachments.

Apply a Form Template
  1. Login to the JobCheck Web Desktop as any user.
  2. Open the job that you will be working on.
  3. Click Attachments.
  4. Select Add Forms.
  5. Select the form you would like to apply > Click Next.
  6. Click View to see a preview of the form with merge fields auto-filled.
  7. Choose to Save or Save & Email the form.

When Form Errors Occur

If any of the form data is missing from the job file, you will receive an error message referring to missing fields.
  1. Click View to see what data will need to be updated in the job prior to applying the form template.
  2. Make any necessary changes/updates to the job file.
  3. Return to Attachments to try again.
JWM-7 Identifier
Recommended Workflow: Using Milestones & Workflows
This tutorial will explain the milestone workflow and how to best use Milestone Templates, the Job Highlights Banner and the Milestone Performance Chart to enhance job management.
JWM-8 Identifier
How to Set Up New Employees and Users

This tutorial will demonstrate how to add, remove and change JobCheck user access.

JWM-9 Identifier
How To: Use the Job Feed
This tutorial will introduce the job feed and demonstrate how to use it to communicate real-time on actionable topics to keep the job moving quickly.
JWM-10 Identifier
How To: Follow a Record

This tutorial will demonstrate how to follow a record so that you can see all posts and activity related to that record. A record can include a job, account, a file or another user.

JWM-11 Identifier
How To: Use Job Feed on the Mobile App

This tutorial will demonstrate how to use the job feed on the mobile app.

JWM-12 Identifier
Recommended Workflow: How to Manage a Job on the JobCheck iPhone App

This tutorial will demonstrate the recommended workflow for field staff using the JobCheck iPhone app as their primary access to job information.

JWM-13 Identifier
How To: Create an Independent Task
This tutorial will demonstrate how to create a single independent task in the JobCheck web application. A user may create single tasks to help track the progress of to-do’s that arise during the production of a job.
JWM-14 Identifier
How to Customize Job Workflows
This tutorial will guide you through customization of the basic job types (Emergency, Restoration, Contents & Other) to ensure important job tasks are included in specific job type workflows. Customizing workflows will help you create standards in job progression to keep you on top of where each job is at and what is required to move it to the next stage of production.
JWM-15 Identifier
How To View, Upload and Email Room Photos, Reports & Files
This tutorial will demonstrate how to view, upload, organize and share your photo and file attachments when accessing the job in a web browser.
JWM-16 Identifier
How to Merge Reports
This tutorial will demonstrate how to use the Merge Reports function under Attachments to merge up to three separate PDF documents into one document or report.
JWM-17 Identifier
How to Customize Email Notifications
This tutorial will demonstrate how to modify and customize the types of email notifications that you will receive from Assured JobCheck. You can choose to turn on/off email notifications for tasks, @mention, daily digest and more.
JWM-18 Identifier
Recommended Workflow – Site Inspection Reports
This tutorial will demonstrate the workflow steps to create a new job file, update the site inspection information and create an initial site report ready to be shared with adjuster.
JWM-19 Identifier
How to Create a Work Order
This tutorial will demonstrate the two different ways to create a work order in the JobCheck system. Work orders can be created as products of the financial plan, or can be created independently from the financial plan and this guide will outline those approaches and the benefits of each. A work order can be created anytime there a work-related task to be completed. Work orders are a way to keep track of what work needs to be completed and if that work is started, in progress or completed. Work orders can be scheduled in a timeline and can also have employee or sub-trade resources assigned to them for time management purposes.
JWM-20 Identifier
How to Create an Environmental Assessment Report
This tutorial will demonstrate the step-by-step workflow to create an Environmental Assessment (EA) Report. The EA report is most commonly used to document the environmental inspection assessment discovered during the walk-through of a job that may have mold damage. The job is started on the desktop, updated from the desktop or mobile app in the field and then reported on from the desktop experience.
JWM-21 Identifier
How to Create a Chain of Custody Report
This tutorial will demonstrate the step-by-step workflow to create a Chain of Custody report. The chain of custody report is used to track job and custody information relating to the samples being taken during the environmental assessment. Multiple custody details can be added to each chain of custody, detailing the specific tests run during that investigation. The chain of custody detail can be updated from either the Salesforce® Mobile app or the JobCheck® web interface, this tutorial will cover both.
BQ-1 Identifier
How To: Send and Retrieve QuickBooks Data
The Assured QuickBooks Connector allows JobCheck to integrate with QuickBooks on two levels:
  1. The Connector shares JobCheck job information and customer account information (i.e. main phone number, address details, and job name) with QuickBooks. It creates the job and the customer in QuickBooks if it doesn’t exist or merges and links this data if it does.
  2. Once a job has been created in QuickBooks, the Connector transfers related revenue and expense data created in QuickBooks, into the financials tab of the job in JobCheck.

Integration Overview

  1. Install the QuickBooks Connector on the accounting computer. See the tutorial “3 – How to Set Up the JobCheck QuickBooks Connector”.
  2. Authenticate the Connector with both QuickBooks and JobCheck.
  3. Log into QuickBooks and open the correct company to integrate with.
  4. Log into JobCheck and open the job you wish to share with QuickBooks.
  5. Send the Job and Contact information to QuickBooks.
  6. Manually update the QuickBooks Connector.
  7. Open QuickBooks to view the contact and job created by JobCheck.
  8. Open the job in QuickBooks and post expenses and revenue.
  9. Manually update the QuickBooks Connector.
  10. Open JobCheck and refresh your browser on the job’s financial page.
You will see the new expense and revenue information appear with a reference to the QuickBooks Accounting ID.

Step 1: Ensure the Account is Created Correctly within the Job

In order to be considered a matched customer in QuickBooks, the customer account in Connect must have the same name, postal code, and phone number as the customer account in QuickBooks.
If the customer account in Connect has the same customer name in QuickBooks, but the postal code and phone number do not match, the system will create a new customer account with the same name but different details in QuickBooks.

Step 2: Send Job to QuickBooks

This can be initiated at any time after the job detail has been created and an account has been associated to the job, even if there is not any financial data yet in the job. As a best practice, we recommend making this part of your job setup process; the job and account will be created or linked in QuickBooks at the next scheduled update, unless the Connector is updated manually.
  1. Log-in to JobCheck as any user.
  2. Select a job and navigate to the Financial tab.
  3. Click on “Create Job in QuickBooks”.
Once the job has been sent to QuickBooks, the header will change to say ‘Accounting – Pending Creation’ (see below).

Now that job has been sent to QuickBooks, it is ‘Pending Creation’ because the job is waiting for the scheduled update that is controlled by the QuickBooks Connector. If you do not want to wait until the scheduled time, you can choose to manually update. 

When the Connector has updated, refresh your screen to see the associated QuickBooks ID appear as well as when it was last updated.

Step 3: Retrieve Expense and Revenue Data from QuickBooks

Once the Connector has updated QuickBooks with the new job and account information from JobCheck, you will be able to see this information appear in QuickBooks under Customers.

The accountant can now begin posting expenses and revenue to the job. When creating transactions, the Reference field in QuickBooks will be visible as the transaction type in JobCheck. To correlate expenses and revenue more quickly, consider including the work order number in the reference field (i.e. Invoice 12345 ). 

The next time the Connector updates, the revenue and expense data posted against the job will push to the linked job in JobCheck and will appear in the QuickBooks panel under the Financial tab.

Having this information allows the user to see what is being processed by accounting and compare it to the actuals being tracked in JobCheck. Notice the QuickBooks ID. The ID will match the QuickBooks customer name and the QuickBooks job name.
Keep in mind that the QuickBooks Connector does not handle updates to already transferred data; it will only update JobCheck with new transactions.
BQ-2 Identifier
How To: Create a Financial Plan

This tutorial will demonstrate how to create a financial plan using your estimate in Assured JobCheck.

A financial plan allows you to budget a total dollar value or gross margin (GM) percentage to complete each category of work and will help you track your job costing and profitability on a given job.
  • Log in to the web desktop as any user.
  • Authenticate the Connector with both QuickBooks and JobCheck.
  • Click on the Financial tab from the secondary navigation bar.
  • Click Edit → Add → Enter a category of work (i.e. Remove Drywall).
  • Enter the value of the estimate for this category of work in the yellow column – if hours for completion are included in the estimate, they can be entered.
  • Enter a Percentage for overhead and profit.
  • Click “Save” to set your financial plan.
Now that the financial plan is set, as work orders are completed, the approximate or known cost for completion can be updated in the progress (blue) column.
See tutorial “13 - PM - Recommended Workflow - Managing Financial Progress”.
BQ-3 Identifier
Recommended Workflow: Managing Financial Progress

How To: Use Source of Business Dashboards

BQ-4 Identifier
How To: Use Source of Business Dashboards

This tutorial will introduce the source of business dashboards, how they are populated and how to use them. Source of Revenue Dashboards and Reports are only visible to users who are assigned the Assured Manager profile.

BQ-5 Identifier
Best Practices: Financial Worksheet Diagram – Creating a Financial Plan
The financial worksheet is a tool that helps outline job value, budget jobs and track your financial progress to better manage job profitability.
SD-1 Identifier
How To: Schedule an Employee for Dispatch

This tutorial will demonstrate how to best assign an available employee for dispatch to a job site.

SD-2 Identifier
Recommended Workflow: Dispatching

This diagram will illustrate the recommended workflow for planning a new job into production using the scheduling/dispatching tool.

SD-3 Identifier
How To: Schedule Events for Production

This tutorial will demonstrate how to schedule events and existing work orders for production.

BPE-1 Identifier
Best Practices: Create a New Job View
This tutorial will demonstrate how to create and save a custom filtered view in accounts.

Create a New Account View:

  1. Login to Assured JobCheck as any user.
  2. Click on Accounts from the primary navigation bar.
  3. Click “Create New View”.
  4. Enter view name (i.e. Insurance Companies).
  5. Specify filter criteria (i.e. Type equals Insurance Company).
    Use the Magnifying glass to search filter values – this will present a list of values to choose from.
  6. Select fields to display (i.e. Account name, billing state/province, phone, type, account owner).
  7. Click “Save”.
You will now have a new view called ‘Insurance Companies’ available in the account view dropdown menu. Follow the above steps to create multiple new views to filter your accounts

Create a New View for Contacts and Employees

The process outlined above for accounts also applies when creating new views in contacts and employees. Simply be conscientious that you will want to apply different filtering criteria and that all filtering criteria will not be the same for all contact types.
BPE-2 Identifier
Best Practices: Build a Custom Report

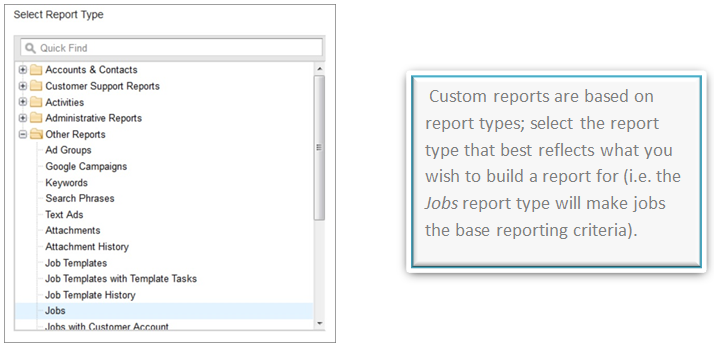
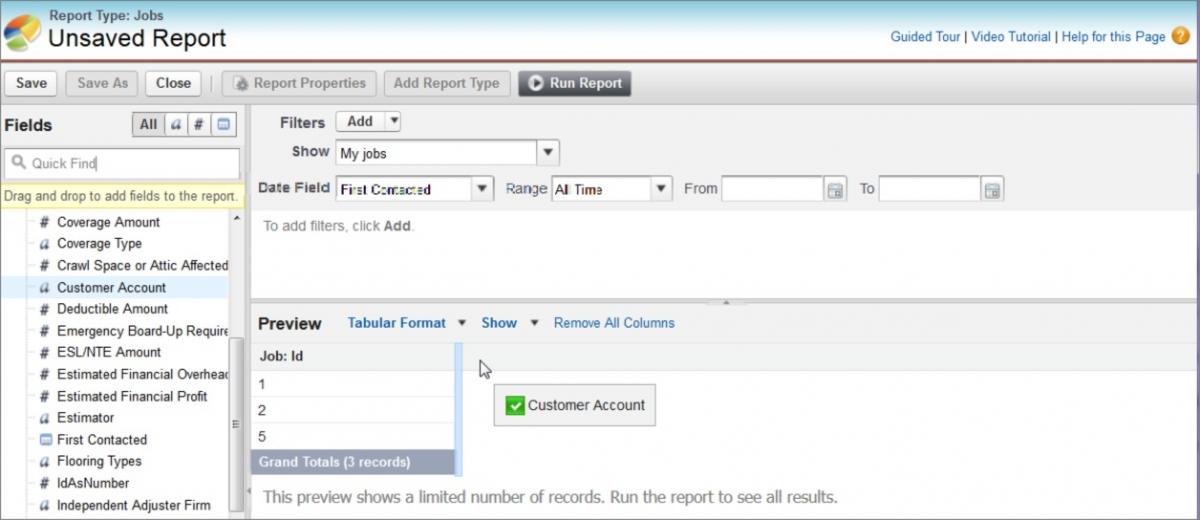
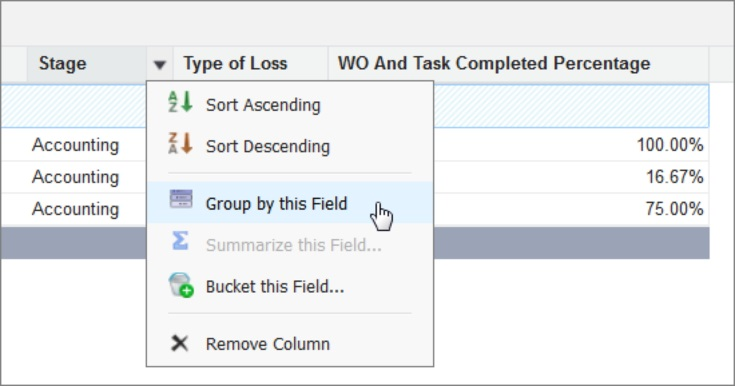
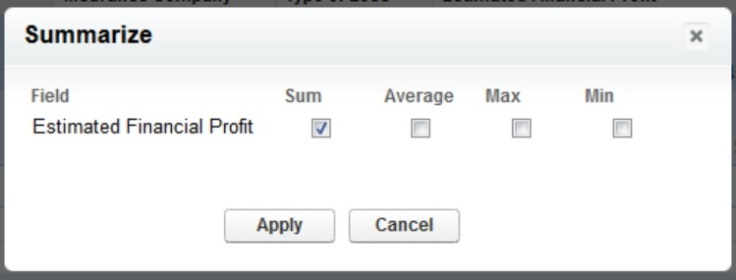
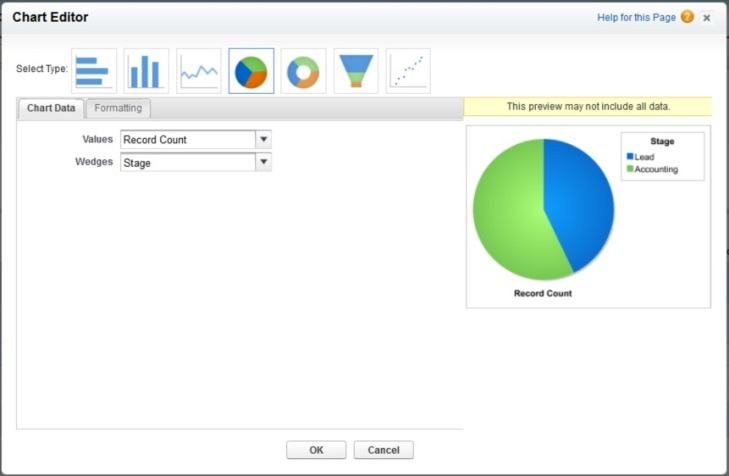
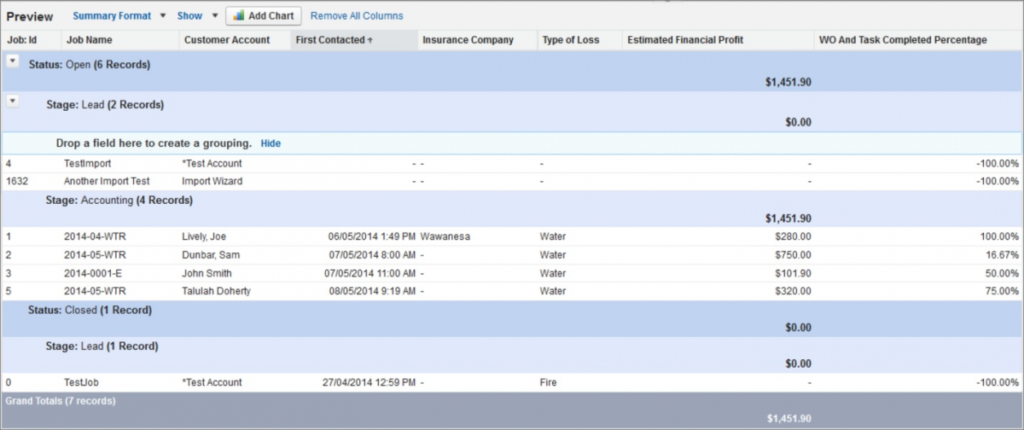
This tutorial will demonstrate how to build a custom report using the Salesforce® report builder. Building a custom report is as easy as dragging and dropping fields – this tutorial will outline the tools available to build a custom report.

  1. Log in to JobCheck web desktop as the admin user.
  2. Click on Reports from the primary navigation bar.
  3. Click “New Report” and select a report type.
4. Click “Create”.
5. Using the Fields menu, drag and drop the fields you would like to add to your custom report.

Optional Report Add-Ons

6. Add a filter to the report. Click “Add” and specify filter criteria.
7. Create groupings within your report. Click the dropdown arrow next to any field and choose “Group by this Field”.
8. Summarize a field that contains a value. Click the dropdown arrow next to the field and choose “Summarize this Field”. Select how you would like to summarize and click “Apply”.
9. Add a chart to your report. Click “Add Chart” and select the type of chart as well as the graphical criteria > Click “Ok”.
10. When you have finished creating and customizing your report, click “Save”.
The new report will be available from your custom reports list. Any user in the system can generate this report, but only the Admin user can edit or delete it.

If you would like to watch a video about getting started with the report builder, click here.

BPE-3 Identifier
Best Practices: Create Accounts and Contacts within a Job

This tutorial will describe the difference between an account and a contact in JobCheck and explain the types of accounts and contacts that can be created on the details page of a new job.

BPE-4 Identifier
Best Practices: JobCheck App Navigation for iOS
This tutorial document will diagram and define the default screens in the JobCheck mobile app for iPhone iOS to help you quickly get oriented with the app and basic usage.
BPE-5 Identifier
Best Practices: iPhone App for iOS – The Difference Between Events, Tasks & Work Orders

This tutorial will highlight the main functional differences between events, tasks and work orders and will identify a few common ways to implement each in your workflow. 

This tutorial is specific to the JobCheck app for iPhone iOS.

BPE-6 Identifier
Best Practices: The Difference Between Accounts, Contacts, Employees & Users
This diagram highlights the key functional differences and use cases for accounts, contacts, employees and users.
BPE-7 Identifier
Best Practices – Inventory Listing Tips & Tricks
This tutorial will provide guidelines to help technicians identify and categorize different listing types and will offer best practices to help keep the listing process fast, accurate and pain-free. Read below to learn how to approach listing items vs. boxed content, low vs. high value content, items with pre-existing damage and non-salvage items.
BPE-8 Identifier
Best Practices: JobCheck User Types Defined
This tutorial outlines the product features for each module of JobCheck and the differences between user types in the JobCheck web application.
BPE-9 Identifier
Best Practices: Archive a Job
This tutorial guides you through the steps required for downloading and archiving jobs which are no longer in production. You can also use these steps to reduce the current size of data storage in the Assured JobCheck cloud system.
VT-1 Identifier
How To: Send and Retrieve QuickBooks Data
The Assured QuickBooks Connector allows JobCheck to integrate with QuickBooks on two levels:
  1. The Connector shares JobCheck job information and customer account information (i.e. main phone number, address details, and job name) with QuickBooks. It creates the job and the customer in QuickBooks if it doesn’t exist or merges and links this data if it does.
  2. Once a job has been created in QuickBooks, the Connector transfers related revenue and expense data created in QuickBooks, into the financials tab of the job in JobCheck.

Integration Overview

  1. Install the QuickBooks Connector on the accounting computer. See the tutorial “3 – How to Set Up the JobCheck QuickBooks Connector”.
  2. Authenticate the Connector with both QuickBooks and JobCheck.
  3. Log into QuickBooks and open the correct company to integrate with.
  4. Log into JobCheck and open the job you wish to share with QuickBooks.
  5. Send the Job and Contact information to QuickBooks.
  6. Manually update the QuickBooks Connector.
  7. Open QuickBooks to view the contact and job created by JobCheck.
  8. Open the job in QuickBooks and post expenses and revenue.
  9. Manually update the QuickBooks Connector.
  10. Open JobCheck and refresh your browser on the job’s financial page.
You will see the new expense and revenue information appear with a reference to the QuickBooks Accounting ID.

Step 1: Ensure the Account is Created Correctly within the Job

In order to be considered a matched customer in QuickBooks, the customer account in Connect must have the same name, postal code, and phone number as the customer account in QuickBooks.
If the customer account in Connect has the same customer name in QuickBooks, but the postal code and phone number do not match, the system will create a new customer account with the same name but different details in QuickBooks.

Step 2: Send Job to QuickBooks

This can be initiated at any time after the job detail has been created and an account has been associated to the job, even if there is not any financial data yet in the job. As a best practice, we recommend making this part of your job setup process; the job and account will be created or linked in QuickBooks at the next scheduled update, unless the Connector is updated manually.
  1. Log-in to JobCheck as any user.
  2. Select a job and navigate to the Financial tab.
  3. Click on “Create Job in QuickBooks”.
Once the job has been sent to QuickBooks, the header will change to say ‘Accounting – Pending Creation’ (see below).

Now that job has been sent to QuickBooks, it is ‘Pending Creation’ because the job is waiting for the scheduled update that is controlled by the QuickBooks Connector. If you do not want to wait until the scheduled time, you can choose to manually update. 

When the Connector has updated, refresh your screen to see the associated QuickBooks ID appear as well as when it was last updated.

Step 3: Retrieve Expense and Revenue Data from QuickBooks

Once the Connector has updated QuickBooks with the new job and account information from JobCheck, you will be able to see this information appear in QuickBooks under Customers.

The accountant can now begin posting expenses and revenue to the job. When creating transactions, the Reference field in QuickBooks will be visible as the transaction type in JobCheck. To correlate expenses and revenue more quickly, consider including the work order number in the reference field (i.e. Invoice 12345 ). 

The next time the Connector updates, the revenue and expense data posted against the job will push to the linked job in JobCheck and will appear in the QuickBooks panel under the Financial tab.

Having this information allows the user to see what is being processed by accounting and compare it to the actuals being tracked in JobCheck. Notice the QuickBooks ID. The ID will match the QuickBooks customer name and the QuickBooks job name.
Keep in mind that the QuickBooks Connector does not handle updates to already transferred data; it will only update JobCheck with new transactions.
VT-2 Identifier
Best Practices: Create a New Job View
This tutorial will demonstrate how to create and save a custom filtered view in accounts.

Create a New Account View:

  1. Login to Assured JobCheck as any user.
  2. Click on Accounts from the primary navigation bar.
  3. Click “Create New View”.
  4. Enter view name (i.e. Insurance Companies).
  5. Specify filter criteria (i.e. Type equals Insurance Company).
    Use the Magnifying glass to search filter values – this will present a list of values to choose from.
  6. Select fields to display (i.e. Account name, billing state/province, phone, type, account owner).
  7. Click “Save”.
You will now have a new view called ‘Insurance Companies’ available in the account view dropdown menu. Follow the above steps to create multiple new views to filter your accounts

Create a New View for Contacts and Employees

The process outlined above for accounts also applies when creating new views in contacts and employees. Simply be conscientious that you will want to apply different filtering criteria and that all filtering criteria will not be the same for all contact types.
VT-3 Identifier
How to Set Up New Employees and Users

This tutorial will demonstrate how to add, remove and change JobCheck user access.

VT-4 Identifier
How To: Follow a Record

This tutorial will demonstrate how to follow a record so that you can see all posts and activity related to that record. A record can include a job, account, a file or another user.

VT-5 Identifier
How To: Schedule an Employee for Dispatch

This tutorial will demonstrate how to best assign an available employee for dispatch to a job site.

VT-6 Identifier
How To: Schedule Events for Production

This tutorial will demonstrate how to schedule events and existing work orders for production.

VT-7 Identifier
Best Practices: JobCheck App Navigation for iOS
This tutorial document will diagram and define the default screens in the JobCheck mobile app for iPhone iOS to help you quickly get oriented with the app and basic usage.
VT-8 Identifier
How To: Add Inventory on the iPad
This tutorial will demonstrate how to create an electronic inventory list in the Assured PackOut iPad app for the PackOut Edition of JobCheck and how to upload that list to the job on your computer.
VT-9 Identifier
How To: Review and Edit an Inventory List
This tutorial will demonstrate how to filter and review an inventory list, mass edit the list and prepare it for pricing or reporting.
VT-10 Identifier
How To: Use Inventory Cleaning Pricing
This tutorial will demonstrate how to price a contents listing after the upload and review of the pack-out inventory list. The priced list can be and sent to adjusters as the cleaning detail to support your invoice.
VT-11 Identifier
How To: Create an Invoice Report
This tutorial will demonstrate how to price a contents listing after the upload and review of the pack-out inventory list. The priced list can be and sent to adjusters as the cleaning detail to support your invoice.
VT-12 Identifier
How To: Update Your Chatter User Profile Photo
This tutorial will guide you through how to update your chatter user profile photo so that your picture will appear next to your name when your activity or relationship to a job is visible.